Monday, March 31, 2014

New Kitchen Lighting Project


New project time!!!
 
When we were designing our kitchen lighting during our renovation over a year ago, I basically ran out of creative steam. 
 
I was making so many decisions all at once, and we were encountering so many issues, that I remember reaching a point towards the end where I was pretty much saying:
 
"Suuuuuuuuure, whatever!  It doesn't matter, that's FINE...."

 
Not only can I not stand my fixtures now, but there are also dark spots ALL over my kitchen.
 
Time to correct that! YAY :)
 
We have decided to go with a recessed can and pendant light combination for our new lighting scheme.
 
Here are the polished nickel KICHLER pendants that I chose for either side of the sink:


We're using 4" recessed cans with glass diffusers on them.  Because we're putting in so many of them (in addition to taking our old fixtures out), we're essentially going to have to re-do our entire ceiling.
 
This is a picture of standard can lights:

 
This is what we are using:
image_thumb30[1]
 
I really just think that the 4" recessed can lights with diffusers look much more 'designer'.  They still solve the lighting issues, and are aesthetically pleasing too.
 
The crazy part is that our entire kitchen ceiling is going to be turned into a "hot mess" because of the wiring installation process.  Translation:  LOTS of sheetrock and plaster dust, turning my home into a yucky dusty mess.
 
I'm looking forward to showing you guys the finished product tho!
 
Stay tuned.....
 
The big kitchen lighting reveal is coming this week!!


Monday, March 10, 2014

Master Bedroom Reveal

Our master bedroom is finally done!
It only took over a year to get my act together and finish it... and share it too! lol


I'm really happy with it now.  I used to prefer every other room in the house to ours, but now our bedroom is my favorite room in the house!


I found these apothecary cabinets at Target, of all places.  Purchased on sale, they were only $100 each!  And the best thing about them is that the bottom 2 rows of mini drawers are actually false.... instead they are 2 normal sized pull out drawers.  Tons of storage for the stuff that we want to hide!


It's completely unlike every other space --- very monochromatic and soothing.  The only 'real' color I used in here was a soft mauve-y pink.  Everything else is in the neutral color palette.

One of my favorite parts of our new space is my little vanity area.  Not only does it make really great use of this awkward space in our bedroom, but it's really practical too. 

 
I purchased the "vanity" at Target, and spray painted + hand painted it a high gloss white.


We only have one full bath upstairs right now, so when guests come to visit, it's the perfect place for us to get ready while guests use the bathroom.  Plus, I can stash all my "girl stuff" in her.  Function + beautiful.... that's what great design is all about.

I'm also really proud of my little DIY fireplace makeover.  Thanks for the idea, Ashleigh! :)


In this house, the word "done" is laughable.  As my husband well knows, I'm never really "done" with anything. 
 
Truthfully though, the only things that we have left to do in our bedroom design-wise are installing a chandelier over the vanity dressing area, and adding new craftsman crown trim to the ceiling.  That's pretty good for me!
 
-
 
Guess I forgot to mention that I just decided to re-do the ceiling and all of the lighting in our kitchen.... and I want it all done before May 2014.

Oh, and because my business has been going really well, I'm moving out of the small guest room and converting our weird walk-in storage room into a workspace for me. 
No biggie -- just a 3 month long renovation that includes all new electrical, flooring, custom shelving, and paint etc.  Super duper excited about this project!

*SIGH*
My poor, poor, supportive husband..... lol ;)

Thursday, March 06, 2014

Charlotte Home & Garden Magazine: Spring 2014 Feature - DIY in Plaza Midwood

I'm very excited to announce that the Spring 2014 issue of Charlotte Home + Garden Magazine featuring our Plaza Midwood home has officially hit stands!


To see the feature article, and the entire issue, visit the links below:


All photo rights and content credit to Charlotte Home + Garden Magazine.
 
Charlotte Home + Garden Magazine can be found at local business partners, Harris Teeter, Barnes & Noble, Park Road Books, etc.
For a complete list visit the Charlotte Home + Garden website.
 
(Side note: Charlotte Home + Garden Magazine also has sister publications --- Charlotte WEDDING and CHARLOTTE Magazine. 
See those here: Charlotte Magazine)
 
 
If you live in the Charlotte, NC area, be sure to check out our home in person in a few months on the local Plaza Midwood Home Tour.  The tour, part of our "Midwood Maynia" festival, runs Friday May 2nd, through Saturday May 3rd, 2014 and is a fundraiser for our neighborhood association. 
 
For more information visit the Plaza Midwood Neighborhood Association website here:
 
PMNA: Midwood Maynia Home Tour

What are your favorite local home tours?


Monday, March 03, 2014

IKEA Vittsjo Hack

My husband hates when I do Ikea hacks. 
That's probably because usually I'll solicit his help to do the parts I don't want to do.  ;-)
 
But this particular Ikea hack is so easy that I didn't even need him!  In fact, I completed the entire project in a single afternoon.

Did I forget to mention that the finished project costs only $70?
Heck yes!
 

Here's what you need:
 
Ikea VITTSJO shelf
 
Gold Spray Paint
 
Single piece of glass cut to shelf size
 
Single piece of mirror cut to shelf size


Prep Work:

When you take all of the pieces out of the box, you'll see that it comes with several glass shelves, as well as 2 black particle board shelves.  You can go ahead and throw the black shelves away, because you won't be using them.

Instead, take one of the glass shelves to your local custom glass & mirror store and tell them that you want:
  • (1) piece of glass that exactly matches the piece that you brought with you
  • (1) mirror cut to the exact dimension as the glass piece
Depending on how busy they are, they can usually cut both pieces in a few hours.  I placed my order in the morning, and it was ready that afternoon.


How To:


1.  First, I assembled the metal frame of the shelving. 


Side note: I left off the metal stabilizing brackets because I think it just takes away from the overall look.  However, if you are going to be putting anything heavy on the shelves, then you need to do the assembly with the brackets.

2.  Next, I spray painted the frame using a metallic gold spray paint. 


I prefer Rustoleum Metallic Brass spray paint.  But since I can't find it anywhere anymore, I've started using Krylon Metallic Spray Paint in Metallic Brass -- it seems to be just as good.  It takes about 2 cans to properly do each shelving unit. 

Side note: Don't forget to spray paint the little black feet that go on the bottom of the unit!

3.   After it dries, all you have to do is place the glass & mirror shelves in place.  The mirrored shelf goes on the very bottom, and the clear glass shelves go on all the rest of the shelf brackets.


Voila!


I used two of the VITTSJO shelves in my sunroom to flank either side of a little seating area.  Because I didn't want to block the light from all of the windows, these work really well.  After I accessorized them, my hubs didn't even recognize that they came from Ikea!
 
When I told him that they both cost me less than $150 total, he practically did cartwheels.
 
Now that's mission accomplished! 

I'm working on some new window treatments for the sunroom, so hopefully you'll get to see the big reveal of the whole room in a few weeks. ;)

Friday, February 21, 2014

Update: My "Workshop" is almost done!

Sorry that it's taken me so long to do this update...  things have been crazy around here as usual.
 
A few weeks ago I found out that our home is going to be featured in the Spring 2014 issue of CHARLOTTE Home + Garden magazine.  Super exciting! 
 
Did I mention that they gave me a week and a half notice to have it photo shoot ready?
Cue the stressful mad dash. 
Fortunately, I had made pretty good progress on my to-do list since we have been trying to get ready for the home tour in May anyways. 
Still, it has been pretty nuts.  And the hubs can attest to that.

Anyways, here is my little DIY X-bench in its new home:

I ended up primarily using it as my seat when I'm sewing at my desk.  But if I choose to take down my craft desk (it's collapsible and comes apart easily), the bench looks adorable right at the foot of the guest bed too.


How fun is the white antelope bust hanging on the wall?  I searched for a really long time to find one the size/scale I liked, and I ended up purchasing this one from White Faux Taxidermy on Etsy.


To see the full post and reveal of my Craft Room makeover, visit my Home Tour.


I have so many cool upcoming things to post and reveal over the next few weeks, so get ready!

Coming soon:

- Ikea VITTSJO Hack -
- Master Bedroom Makeover Reveal -
- Chinoiserie Bamboo Chairs Makeover -
- Sunroom Reveal -
- Summer-Ready Gazebo Makeover -


Wednesday, January 15, 2014

$50 X Bench Ottoman Makeover

Here's the Before & After story of my $50 ottoman makeover!


I'm thrifty.  
That's a nice way of describing what I really am: CHEAP.

I know, not exactly a secret. ;)

When I saw this X bench ottoman, I fell in love with it.  But I did NOT fall in love with the price tag!

$200?  I mean, really??

That would be a NO.

Then a few months ago, I was wandering through the clearance section in HomeGoods, and I stumbled across a hideous little ottoman.  Even despite the awful fabric, and the cheap faux silver paint on the legs, I saw potential in it.  I loved the size and scale, and the fact that it had the "X" bench legs like that expensive ottoman I saw online.  

I flipped it over, and when I saw the red $49 clearance sticker, I practically ran to the check-out line.


It really wasn't that hard to give it a makeover.  It took me less than 2 hours to do it from start to finish, and it only cost me $50!


Here's what I did:

Step 1:  Disassemble the top upholstered cushion from the legs.  Like any chair, there are usually 4-6 screws that screw the cushion in place.


Step 2: Spray paint the legs.
In this case, I chose a gold spray paint to get that trendy gilt look.


If you ever want to paint something a gold color, use Krylon's Metallic Brass spray paint.  I have tried pretty much every can of spray paint on the market, and this is by far my favorite!


.....And it's only $3.95 at Home Depot or Lowes.  
I know, whaaaaat??!?  
I always keep cans of this in the house because I'm forever spray painting stuff gold.  I had a half-used can in my basement, so essentially this was free.

Step 3:  Upholster seat cushion with a fabric liner.
To cover up this hideous fabric, I needed to add a solid neutral liner to the cushion first.  It's almost like adding a primer on top of dark walls before you paint them a lighter color.... you don't want the darker pattern to show through.  I actually had some laying around from an old project, so this didn't cost me anything either.


Much better.  Now you can't see that ridiculous fabric :)

Step 4: Upholster the seat cushion with the fabric of your choice.
Measure out your fabric, leaving enough room around the edges to wrap the fabric underneath the cushion (usually about 3-4 inches is enough depending on the thickness of your cushion).


I'm in a phase right now where I'm really into the Greek Key thing, so I fell in love with this green Greek Key fabric the moment I saw it.  (Apparently other people did too, because this pattern is almost sold out in my Etsy shop!)  

I got such a great deal on this fabric, and used such a small amount to cover the cushion, that it only ended up costing me around $1.50 worth of fabric.

Flip your fabric over, and laying the cushion face down on it, start to pull the fabric taught.  Using your staple gun, secure the fabric in place.


I always start with the longest sides first, then do the shorter sides, and I save the corners for last.  This helps prevent any wrinkles or bubbles, because I can always cover up imperfections when I get to the corners.
It's extremely important to pull the fabric VERY tightly around the corners in order to get a professional tailored look.


Step 5: Trim off any excess fabric that is hanging off where you stapled it.
At this point, you could always get super fancy and add a finishing liner to the bottom so you don't see any of these messy corners.

Obviously, I'm lazy, so I skipped that part.


Step 6: Re-attach the upholstered cushion to the spray painted legs, and step back and admire your finished product!


Ta da!


Another shot of the Before & After:

Gahhh that "Before" is B-A-D lol.

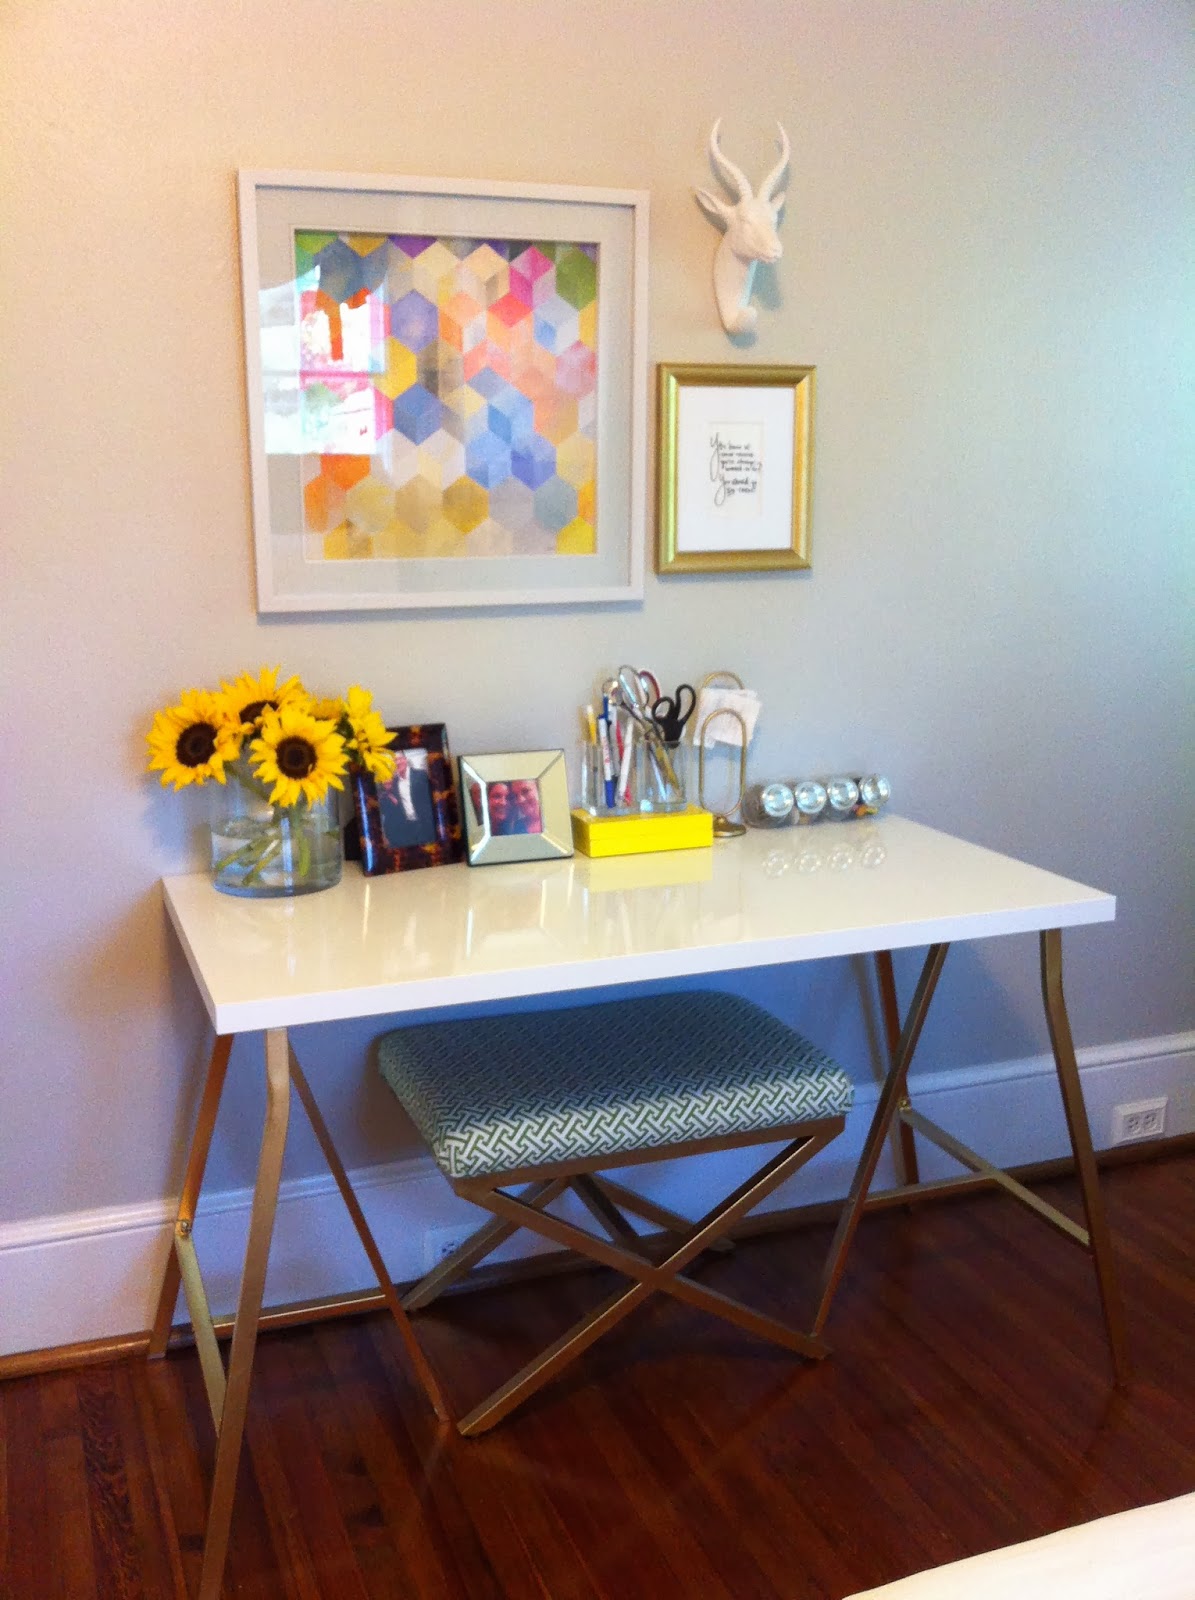
I'm using my refurbished $50 X bench in my newly redecorated craft room/smaller guest room, and I adore it!  
I can use it a seat for my sewing table when I'm working on Etsy orders, and I especially love the fact that it slides neatly underneath when I'm done. Or, when we have guests, I can position it at the end of the guest bed where it looks equally cute.

I'm almost done with my little craft room redesign (so excited about it!), so I'll post about that soon!